🐸 Rybbit — open-source and privacy-friendly alternative to Google Analytics Replacement!
Self Hosting Guide
This guide will walk you through setting up your own instance of Rybbit.
Prerequisites
Before you begin, ensure you have the following:
- A Server: Try to get one with at least 2GB of RAM.
- We use Hetzner for everything. Use our referral link to get a 20 dollars of credits. It should last you almost half a year. The AMD CX11 is a good choice for ~$4/month.
- Or there is Hostinger. The 24-month VPS I recommend with 4 cores and 16GB only costs a minimum of $7. link
- A Domain Name: You’ll need a domain or subdomain (e.g.,
tracking.yourdomain.com) pointed to your VPS’s IP address. HTTPS is required because browsers block tracking scripts served over insecure HTTP. - Git: Needed to clone the repository.
This guide has been tested on Ubuntu 24 LTS (x86_64). If your server is ARM, it must be at least ARMv8.2-A for Clickhouse support.
Setup Steps
1. Point Your Domain to Your VPS
Configure your domain’s DNS settings to point to your VPS’s public IP address. This usually involves:
- Finding your VPS’s public IPv4 address (from your hosting provider, e.g., Hetzner).
- Logging into your domain registrar or DNS provider (e.g., GoDaddy, Namecheap, Cloudflare).
- Adding an
Arecord:
- Host/Name: Your desired subdomain (e.g.,
tracking) or@for the root domain. - Value: Your VPS’s IPv4 address.
- TTL: Default or a low value (e.g., 300 seconds) for faster updates.
DNS changes might take some time to propagate globally. Use DNS Checker to verify.
2. Install Docker Engine
Connect to your VPS via SSH.
Follow the official Docker Engine installation instructions for your Linux distribution: https://docs.docker.com/engine/install/
3. Clone the Rybbit Repository
Clone the project repository from GitHub (Git is usually pre-installed on most server distributions):
git clone https://github.com/rybbit-io/rybbit.gitcd rybbit4. Run the Setup Script
The repository includes a setup script that configures the necessary environment variables (including generating a secure secret) and starts the application using Docker Compose.
⚠️
Important: Make all scripts executable before proceeding!
chmod +x *.shRun the setup script, replacing your.domain.name with the domain or subdomain you configured in the prerequisites:
./setup.sh your.domain.nameThe script will create a .env file and then build and start the containers. This might take a few minutes the first time.
By default, we assume you are on a blank VPS and automatically setup a Caddy webserver. If you want to use your own webserver, checkout the Advanced Self-Hosting Guide.
5. Sign Up
Once the services are running and DNS has propagated, Caddy (the webserver) will automatically obtain an SSL certificate for your domain.
Open your browser and navigate to https://your.domain.name/signup (using the domain you provided to the setup script).
Create your admin account. You can then log in and start adding your websites!
Managing Your Installation
Rybbit comes with several helper scripts to manage your installation:
- start.sh: Start all services after they’ve been stopped
./start.sh- stop.sh: Stop all running services
./stop.sh- restart.sh: Restart all services
./restart.sh- update.sh: Update to the latest version by pulling new code and rebuilding containers
./update.sh
💡
If you are using your self-hosted Rybbit without anyone else, you can disable new user signups by setting DISABLE_SIGNUP=true in the .env file at the root of the repository.
Advanced
This guide covers advanced configuration options for self-hosting Rybbit.
Setup Script Options
The setup script supports several options:
./setup.sh <domain_name> [options]Available options:
--no-webserver: Disable the built-in Caddy webserver--backend-port <port>: Set custom host port for backend (default: 3001)--client-port <port>: Set custom host port for client (default: 3002)--help: Show help message
Examples:
# Custom ports with built-in webserver./setup.sh tracking.example.com --backend-port 8080 --client-port 8081 # Custom ports with your own webserver./setup.sh tracking.example.com --no-webserver --backend-port 8080 --client-port 8081When you specify custom ports, only the host port mapping changes. Inside the Docker containers, the services still use ports 3001 and 3002.
Using Your Own Web Server
If you prefer to use your own web server (such as Nginx or Apache) instead of the built-in Caddy server, you can use the --no-webserver flag:
./setup.sh your.domain.name --no-webserverThis will:
- Not start the Caddy container
- Expose the backend service on host port 3001 (or your custom port)
- Expose the client service on host port 3002 (or your custom port)
You’ll need to configure your web server to proxy requests to these services. Here’s an example Nginx configuration:
server { listen 80; server_name your.domain.name; return 301 https://$host$request_uri;} server { listen 443 ssl; server_name your.domain.name; # SSL configuration (using Let's Encrypt) ssl_certificate /etc/letsencrypt/live/your.domain.name/fullchain.pem; ssl_certificate_key /etc/letsencrypt/live/your.domain.name/privkey.pem; # API requests - adjust port if you customized it location /api/ { proxy_pass http://localhost:3001; # or your custom port proxy_set_header Host $host; proxy_set_header X-Real-IP $remote_addr; proxy_set_header X-Forwarded-For $proxy_add_x_forwarded_for; proxy_set_header X-Forwarded-Proto $scheme; } # Client app - adjust port if you customized it location / { proxy_pass http://localhost:3002; # or your custom port proxy_set_header Host $host; proxy_set_header X-Real-IP $remote_addr; proxy_set_header X-Forwarded-For $proxy_add_x_forwarded_for; proxy_set_header X-Forwarded-Proto $scheme; }}For a detailed step-by-step guide on setting up Nginx with SSL certificates using Certbot, see our Nginx Setup Guide.
Custom Nginx Setup
Rybbit comes with a built-in webserver (Caddy), but you can use your own web server by using the --no-webserver flag on the setup.sh script. This is an example of how to set up Nginx with SSL certificates using Certbot.
Prerequisites
- A domain name pointing to your server
- A Linux-based server (these instructions use apt-based systems like Ubuntu/Debian)
Setup Process
1. Run the Setup Script
./setup.sh your.domain.name --no-webserver2. Install Nginx and Certbot
First, install Nginx and Certbot on your server:
# Update package listssudo apt update # Install Nginxsudo apt install nginx # Install Certbot and the Nginx pluginsudo apt install certbot python3-certbot-nginx3. Configure Nginx
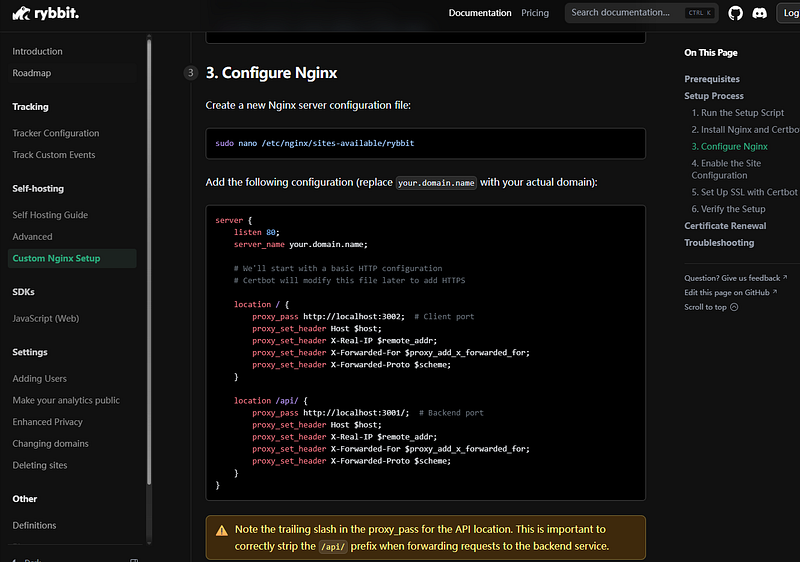
Create a new Nginx server configuration file:
sudo nano /etc/nginx/sites-available/rybbitAdd the following configuration (replace your.domain.name with your actual domain):
server {
    listen 80;
    server_name your.domain.name;

    # We'll start with a basic HTTP configuration
    # Certbot will modify this file later to add HTTPS

    location / {
        proxy_pass http://localhost:3002;  # Client port
        proxy_set_header Host $host;
        proxy_set_header X-Real-IP $remote_addr;
        proxy_set_header X-Forwarded-For $proxy_add_x_forwarded_for;
        proxy_set_header X-Forwarded-Proto $scheme;
    }

    location /api/ {
        proxy_pass http://localhost:3001/;  # Backend port
        proxy_set_header Host $host;
        proxy_set_header X-Real-IP $remote_addr;
        proxy_set_header X-Forwarded-For $proxy_add_x_forwarded_for;
        proxy_set_header X-Forwarded-Proto $scheme;
    }
}
⚠️
Note the trailing slash in the proxy_pass for the API location. This is important to correctly strip the /api/ prefix when forwarding requests to the backend service.
4. Enable the Site Configuration
Enable the site by creating a symbolic link and test the configuration:
# Enable the sitesudo ln -s /etc/nginx/sites-available/rybbit /etc/nginx/sites-enabled/ # Test the configurationsudo nginx -t # If the test is successful, restart Nginxsudo systemctl restart nginx5. Set Up SSL with Certbot
Certbot can automatically configure Nginx to use HTTPS:
sudo certbot --nginx -d your.domain.nameCertbot will automatically modify your Nginx configuration to include SSL certificate settings and HTTPS server blocks.
6. Verify the Setup
Your final Nginx configuration (in /etc/nginx/sites-available/rybbit) should now include HTTPS settings. You can check it with:
sudo cat /etc/nginx/sites-available/rybbitIt should include SSL certificate paths and a server block for HTTPS.
Certificate Renewal
Certbot creates a systemd timer that automatically renews certificates before they expire. You can verify it’s active with:
sudo systemctl status certbot.timerYou can also test the renewal process (without actually renewing) using:
sudo certbot renew --dry-runTroubleshooting
If you encounter issues:
- Check Nginx error logs:
sudo tail -f /var/log/nginx/error.log
Verify that the Docker containers are running and exposing the correct ports:
docker ps
Test connectivity to the backend and client services:
curl -v http://localhost:3001curl -v http://localhost:3002
If the Certbot automatic configuration fails, you can manually add SSL configuration to your Nginx server block.


Member discussion