Why I Abandoned WordPress for VPS Hosting: A RackNerd and Dokploy Guide
This is a promotional article. If you purchase RackNerd services through the links in this article, I will receive a commission. These commissions support me in creating more valuable content. Thank you for your support!
As a content creator on Medium, website speed has always been my priority. For years, I relied on WordPress to build websites, but over time, I grew increasingly frustrated with its slow loading times and bloated plugin system.
After much exploration, I found an excellent solution: purchasing a cost-effective VPS (Virtual Private Server) and using modern deployment tools to quickly build websites. Today, I’ll share how to use RackNerd VPS and Dokploy to create a fast, flexible, and affordable website.
Why Choose a VPS Over WordPress Hosting?
Traditional WordPress hosting may be simple to set up, but typically:
- Slow speed and limited resources
- High monthly costs for mediocre performance
- Limited customization options
With a VPS, you get:
- Complete control
- Better performance and scalability
- More cost-effective in the long run
Step 1: Purchase a RackNerd VPS Server
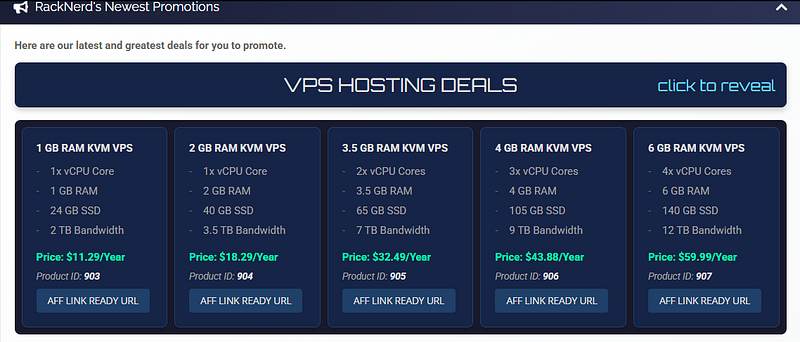
RackNerd offers some of the most competitive VPS plans in the industry. Here’s how to purchase:
- Visit the RackNerd website
- 1x vCPU Core
- 1 GB RAM
- 24 GB SSD
- 2 TB Bandwidth
Price: $11.29/Year
Buy

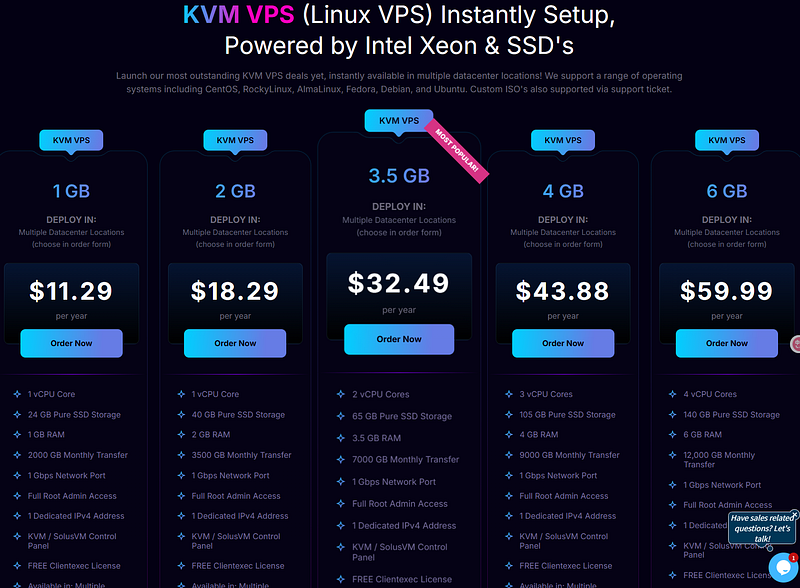
- Click on “VPS Hosting” and select a plan that suits your needs
- For a general blog, an entry-level plan with 1GB RAM is sufficient
- If your budget allows, consider a 2GB RAM plan for better performance
- Select your preferred operating system (Ubuntu 20.04 LTS or 22.04 LTS recommended)
- Complete the payment process
- Check your email for server IP, username, and password
Step 2: Connect to Your VPS via SSH
After receiving your server information, you’ll need to connect via SSH:
For Windows users:
- Download and install PuTTY
- Enter your server IP address
- Log in using the username and password provided by RackNerd
For Mac/Linux users: Open Terminal and enter the following command:
ssh username@your-server-ipThen enter your password.
Step 3: Install Dokploy
Dokploy is a powerful open-source tool that helps you deploy various applications quickly. Installation is straightforward:
# Update system
apt update && apt upgrade -y
# Install Docker (if not already installed)
apt install -y docker.io docker-compose# Install Dokploy
wget -O install.sh https://get.dokploy.com && bash install.sh# Start Dokploy
dokploy start
After installation, Dokploy will automatically generate a random password and access URL, typically http://your-server-ip:3000.
Step 4: Exploring Dokploy Templates
Dokploy’s greatest advantage is its wide variety of ready-to-use templates. Here are some of the most popular ones:
Content Management Systems
- Ghost: A modern, lightweight alternative to WordPress, perfect for bloggers
- WordPress: If you still need WordPress but want better performance
- Strapi: Headless CMS for flexible content management
Web Applications
- NextJS: React framework for production-grade websites
- NuxtJS: Vue.js framework for building modern web applications
- SvelteKit: Fast, efficient framework with minimal JavaScript
E-commerce Platforms
- WooCommerce: For WordPress-based online stores
- Shopify Alternative (Medusa): Open-source e-commerce solution
- OpenCart: Feature-rich shopping cart solution
Static Site Generators
- Hugo: Extremely fast static site generator
- Jekyll: Simple, blog-aware static site generator
- 11ty (Eleventy): Simpler static site generator
Developer Tools
- GitLab: Self-hosted Git repository management
- Gitea: Lightweight code hosting solution
- VS Code Server: Code editor accessible through the browser
Database Management
- phpMyAdmin: Web interface for MySQL/MariaDB
- pgAdmin: Management tool for PostgreSQL
- MongoDB Express: Web-based MongoDB admin interface
Step 5: Deploying Your Website with Dokploy
- Access
http://your-server-ip:3000through your browser - Log in using the generated password
- Click on “Applications,” then click “Install”
- Select your desired template:
- Ghost blog platform (excellent WordPress alternative)
- NextJS (modern React framework)
- Hugo (static site generator)
- Or even WordPress (if you still need it)
- Complete the configuration according to the wizard, including:
- Domain name setup
- SSL certificate configuration
- Custom application settings
Within minutes, your application will be successfully deployed and running!
Step 6: Advanced Dokploy Configuration
Once you’re comfortable with basic deployments, Dokploy offers advanced features:
Custom Domains and SSL
- In Dokploy dashboard, select your application
- Go to “Settings” → “Domains”
- Add your domain name
- Enable “Auto SSL” for automatic HTTPS
Backups and Restoration
- Navigate to your application dashboard
- Click “Backups”
- Schedule automatic backups or create manual ones
- Restore previous versions with a single click
Performance Optimization
- Go to “Settings” → “Resources”
- Adjust RAM, CPU, and storage allocations
- Enable caching options if available for your template
Advanced Monitoring
- Click on “Monitoring” in the main dashboard
- View real-time statistics for CPU, memory, and storage
- Set up alerts for potential issues
Why This Solution Beats Traditional WordPress Hosting
- Speed: Self-hosted applications are typically 10x faster than WordPress on shared hosting
- Cost: RackNerd’s VPS prices are highly competitive, with annual fees often cheaper than monthly WordPress hosting
- Flexibility: Run multiple websites, APIs, or other services simultaneously
- Learning opportunity: Gain valuable server management experience
Conclusion
Abandoning traditional WordPress hosting for a VPS+Dokploy combination has completely transformed how I create and manage websites. Not only has my website speed significantly improved, but my monthly costs have also been reduced by more than half.
For creators who enjoy trying new things, this is a worthwhile skill to invest in. Once you’re familiar with this process, you’ll no longer be constrained by traditional website-building platforms.
If you decide to try this approach, please consider using the links in this article to purchase RackNerd services. You’ll not only get quality VPS service but also support me in creating more similar content.
Questions or suggestions? Feel free to leave a comment below!


Member discussion